How to Encrypt a Folder for Your Mac?
- Aug 14, 2020
Everyone should have privacy and secrets on their phone or computer. Whether it’s a job requirement or protecting your privacy, it’s important to encrypt your important files. So, today I’m going to share how to create an encrypted folder with your Mac app to protect some private or important files. If you are interested in knowing more about this tick, continue reading.
Steps to create an encrypted folder on a Mac:
Step 1: Open the Launchpad > click Other > open the built-in Disk Tool.
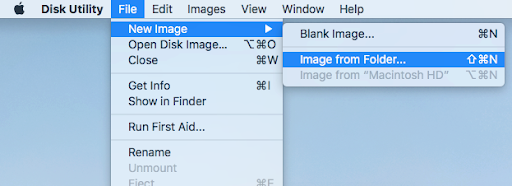
Step 2: Click “File > New Image > Blank image” in the top left menu bar
Step 3: In the pop-up window, you can set the name of the encrypted folder, the location of the storage (desktop for demonstration purposes), and the size (you can also adjust the storage size later from the disk application) according to your needs and preferences.
Step 4: In the Encryption option, select 128-bit AES Encryption (Recommended)
Step 5: Enter the password and verify it. Click the sign on the right to set the password length and check the password strength.
Step 6: Click “Select” to indicate successful password setting.
Step 7: Click save and the computer will automatically create an encrypted folder for you.
Step 8: Once created, your desktop will generate a DMG file and disk icon called “Encrypted Folder.”
Step 9: Open the encrypted disk you created, put in the file you want to encrypt, and select exit disk.
Step 10: When you need to access the encrypted file, just double-click the DMG file of the encrypted folder and enter the password to open the disk of the encrypted folder.
In a word, it’s also a good idea to create encrypted folders on your Mac to keep important files secure and private without installing third-party encryption tools.
Popular Posts
- What Kind of Programs do You Think are Necessary in Windows 10?
- What’s SpyHunter and How to Fix the File Being Quarantined
- How to Forcibly Remove a Program That Won’t Uninstall in Windows
- 3 Tips to Remove a Program that Won’t Uninstall
- How To Uninstall Applications On Windows 10 – Program Removal Guides
- Tutorial: How to Remove & Uninstall Programs / Applications on Windows 7