How to Downgrade Your Mac from macOS Big Sur Back to Catalina?
- Dec 03, 2020

If you’ve updated your Mac to the latest version of macOS Big Sur, after using for a period of time and find that you prefer Catalina, here is a method you may want to know to get your Mac from macOS BIG Sur back to Catalina.
1. Back up you files before downgrading your Mac.
2. Download macOS Catalina from Mac App Store but don’t click on Open when the download is finished.
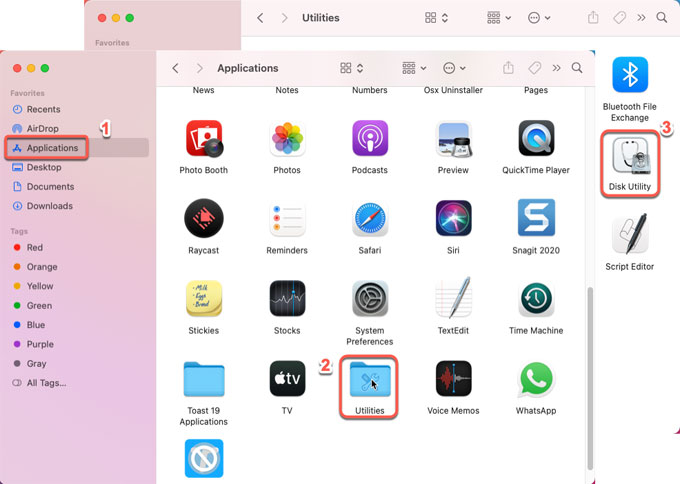
3. Plug in an external USB drive with enough space. Click Applications > click Utilities > click Disk Utility (or you can press Command + spacebar and start to type Disk Utility).
4. Select the root drive in the sidebar > click on Erase.
5. Click Mac OS extended (Journaled) as the format
6. Click GUID partition as the Scheme.
7. By default, your drive will be named Untitled, you could name it as Catalina or the name you want.
8. Click on Erase.
9. Wait for a while and the Disk Utility will create the partition and set up the drive.
10. Click Done.
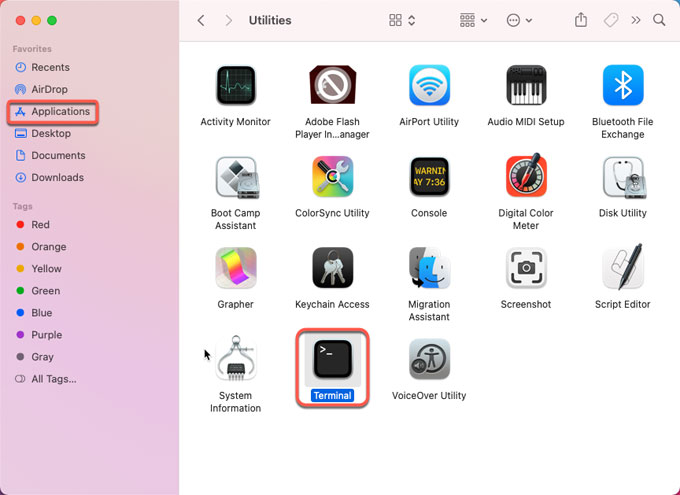
11. Click Applications > open Terminal.
12. Copy the text that corresponds to the version of macOS Catalina you want to install into Terminal. And you can look at the text as:
sudo /Applications/Install\ macOS\ Catalina.app/Contents/Resources/createinstallmedia –volume /Volumes/MyVolume
13. Click Enter/Return.
14. Terminal will require you enter a password. You won’t see characters appear as you fill in, you just need press Enter key after tying in the passwords.
15. You will get a prompt that it will erase the drive. If you want to continue, type Y and then press Return. Please wait while erasing disk will take a few of minute. You will see “Erasing Disk: 0%… 10%… 20%… 30%…100%…”
16. After that, Terminal will copy your installer file to your drive. Once completed, it will appear on the Terminal window. You will see the words Copy complete and Done appear.
17. Plug the bootable installer into the Mac that you want to downgrade macOS Big Sur to macOS Catalina.
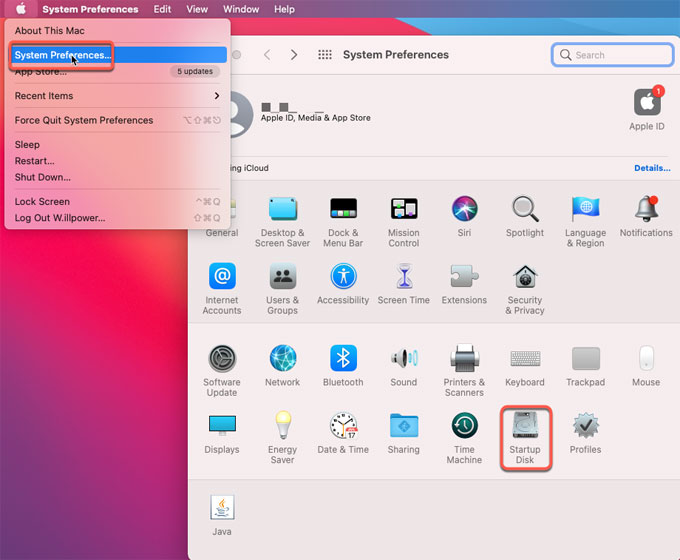
18 Click Apple menu > click System Preferences > click Startup Disk.
19. Choose the external drive with your installer as the startup disk and click Restart.
20 The Mac will shut down and restart in Recovery mode. Make sure your WiFi is connected during the whole process.
21. Select Reinstall macOS from Utilities > click Continue.
22. Now you Mac should install the older version of the macOS Catalina.
Till now, you may understand how to downgrade your Mac from macOS Big Sur to Catalin
Popular Posts
- What Kind of Programs do You Think are Necessary in Windows 10?
- What’s SpyHunter and How to Fix the File Being Quarantined
- How to Forcibly Remove a Program That Won’t Uninstall in Windows
- 3 Tips to Remove a Program that Won’t Uninstall
- How To Uninstall Applications On Windows 10 – Program Removal Guides
- Tutorial: How to Remove & Uninstall Programs / Applications on Windows 7