How to Create a Spreadsheet in Numbers on Mac?
- Aug 26, 2020

As one of the iWork productivity suites, Numbers is probably the most common-used Mac productivity application. It has very fast startup response speed, friendly keyboard shortcuts, iCloud Drive multi-device sync, and many other features. No matter what you want, list management or corporate report arrangement, Numbers is a priority on a Mac. So, how can you user Mac Numbers to create a spreadsheet?
Open Numbers, the most basic feature we encounter is to quickly add a row or column. By default, Excel tiles an infinite number of table cells, but simple Numbers show only a limited number of rows and rows. If you want to add rows and columns after the last row or column of the table, move the cursor directly around the last row number or the last letter near column, hold down the「=」symbol and drag to expand the table.
You can also quickly expand the table by using the anti-L button in the bottom right corner of the table. In addition, right-clicking on a row number or column letter gives you the option to insert a row above or a particular row below, or to insert a column left or right of a particular column, which is also a common feature. Next, refer to the steps regarding how to create a spreadsheet on a Mac.
How to Create a Spreadsheet?
Step 1: Click Finder > Open Applications folder > Click Numbers. You will look at Choose a Template window. If the window doesn’t appear, you need to click New document in the bottom-left corner.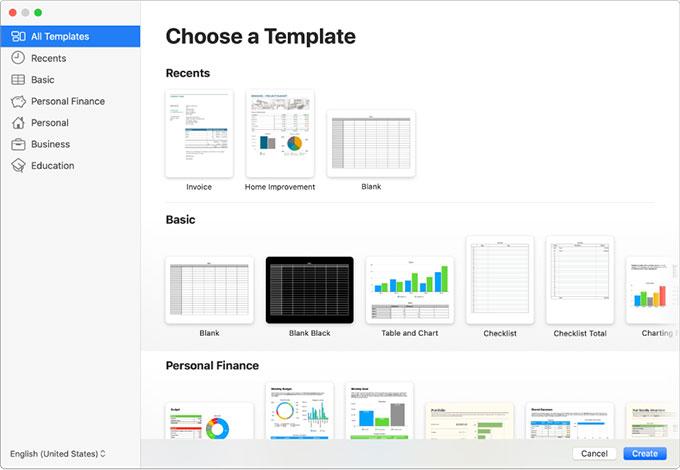
Step 2: In the Choose a Template window, you can choose to view by category or browse all templates. Double-click the template that you want to open.
Step 3: Add your table headers and data
Step 4: Click File > Click Save. You need to type in the table’s name, location at first.
Step 5: When it is finished, you can click red close button to close the spreadsheet.
Popular Posts
- What Kind of Programs do You Think are Necessary in Windows 10?
- What’s SpyHunter and How to Fix the File Being Quarantined
- How to Forcibly Remove a Program That Won’t Uninstall in Windows
- 3 Tips to Remove a Program that Won’t Uninstall
- How To Uninstall Applications On Windows 10 – Program Removal Guides
- Tutorial: How to Remove & Uninstall Programs / Applications on Windows 7