General Guides for Windows 8/8.1: Systematically Remove Software from You PC
- Nov 23, 2018
One thing you mostly have to go through on your personal computer is to remove software that you don’t need anymore, and those you didn’t even want in the first place. This may look as easy as wiping a table to you, however, there might be some steps you typically missed or skipped for wrong reasons, and that’s how trashes stack up in the disks and drag down the whole system.
To avoid such problems, you may take a little time to read this post, and have a complete understanding of correct removal.
1. Where do I start the cleaning job?
Every program has its own uninstaller that can be activated in two places:
- Folder of the Program
Remember where you installed it? Visit the folder to see if there is an executable file named “unins.000” (or others similar). By double-clicking it you will start the removal. The processes of different programs are basically the same: ask for your confirmation to uninstall > ask why you want to do this > give you an option to remove or keep your personal settings > clean out itself > confirm to you that the removal is done > ask whether to reboot right away or later. Some may be simpler.

If you’re not able to recall where you installed this program, right-click its icon on the desktop and select “Properties” to find out, easy-peasy.
- Programs and Features
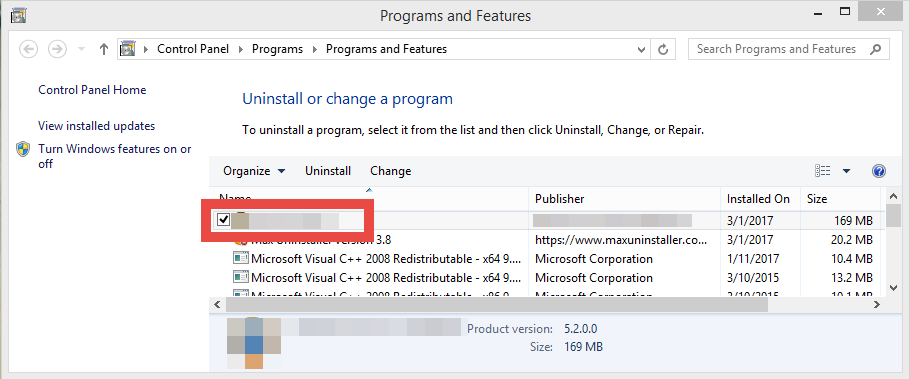
No matter you’re using Start Screen or Start Menu, move your mouse pointer to the bottom left corner, right-click the Windows logo, and select “Programs and Features”.
Then you should be looking at the list showing you what programs are being installed in the system exactly. Just scroll down to find the one you want to kick out, and double-click it to activate its built-in uninstaller. The rest shall be the same as previously mentioned.

Now you might be like “Dude, I’ve already known this.” But I’d say the following content is worth your time.
2. Leftovers? How do I delete them?
Even though you check the option “Remove my personal settings” on the said uninstaller, there are still vestiges left behind somewhere in the system. BUT please note: unless you have uninstalled other programs of the same developer/publisher, do not take risks to delete the files you think are no longer in use.
If you’re sure there is no other program related to the one you have uninstalled in Step 1, check the following places:
- Folder of the Program
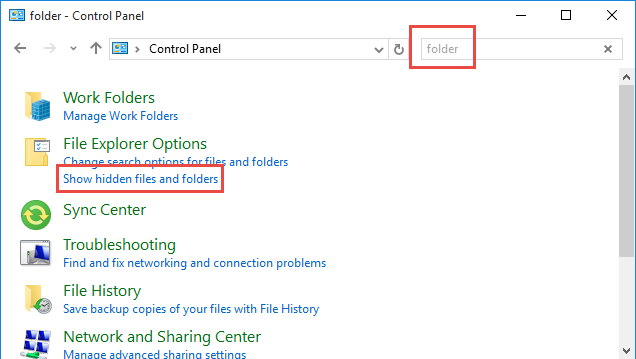
Firstly, make the hidden files and folders show: right-click the Windows logo > select Control Panel > Type “folder” into the search bar > select “Show hidden files and folders”.
Then go back to the folder you installed this program, and simply delete it.

- Registry Editor
This is a place where you certainly cannot delete things by mistake. But as long as you follow correct guides, on problems shall occur afterwards. To access it: hover your mouse pointer to the bottom right corner until you see the charms bar > select “Search” > Type “regedit” in the Search box > select “regedit” in the results.
Then you should be looking at the Registry Editor.
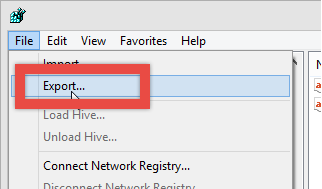
In case you delete anything improperly, you may choose to export the whole registry and save it as a backup: click “File” on the navigator > select “Export…” > save it to a location.

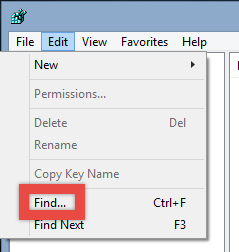
To delete the leftovers of the program you have previously uninstalled: click “Edit” on the navigator > select “Find…” > Type “(the name of the program)” in the search box to find the vestiges > delete them.

At last
Removing programs is one way to improve performance of the system, and by doing such you can save a lot of disk space for other necessary purposes. This is just like the house cleaning we timely do – small time in exchange for long-term comfortableness, why not?
Popular Posts
- What Kind of Programs do You Think are Necessary in Windows 10?
- What’s SpyHunter and How to Fix the File Being Quarantined
- How to Forcibly Remove a Program That Won’t Uninstall in Windows
- 3 Tips to Remove a Program that Won’t Uninstall
- How To Uninstall Applications On Windows 10 – Program Removal Guides
- Tutorial: How to Remove & Uninstall Programs / Applications on Windows 7
Comments
You must be logged in to post a comment.