Automator for macOS – How to Batch Rename Photos With Mac Automator
- Jul 06, 2020

Automator comes with great abilities to automate all what you want to do on your Mac computer. Whether you want to create automations, create workflows, perform some complex tasks or more, Automator is able to make it simple just like one action. Many Mac users use Automator to create their own workflows that indeed take some time to create and debug but also carriy out much more convenience in the following work or learning. So, Automator is time-saving and productive choice.
Rename A Group of Photos in Mac OS X Using Automator
A lot of people like photography and they will take many photos while going out. So the problem is coming, some people don’t know how to better manage those photos randomly named by camera when copy to their Mac computers. Thus, it is very important to rename those photos clearly when manage them. At this point, we recommend you use Automator, which has the function to rename files’ name in bulk.
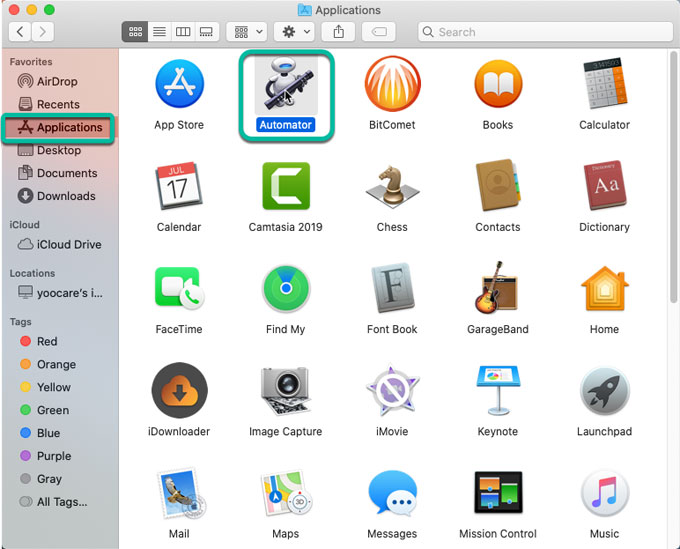
Step 1: Click Finder > click Applications folder > open Automator app on your Mac > select File > click New.

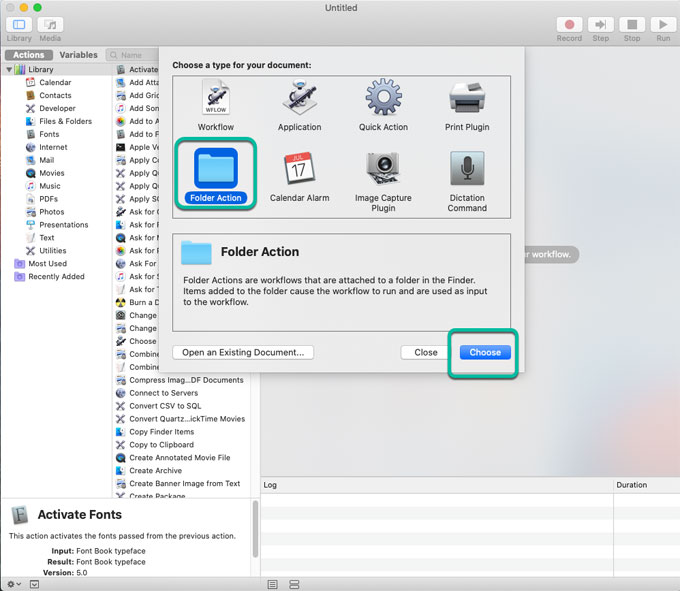
Step 2: Select a type of workflow you want to create. At this time,we need to choose Folder Action. This action will enable workflow when files are added to a specified folder, and those files will be regarded as input to the workflow.

Step 3: After selecting Folder Action, you will see a blank workflow pane. Now what you need to do is to drag your photos to this specified folder and they will be automatically renamed to some specific strings with corresponding creation date. So you can better manage your photos according to the shooting time.
Step 4: When the folder action window opens, choose your specified folder by clicking the drop-down menu. At first you need to create a folder on your Mac before starting this step.
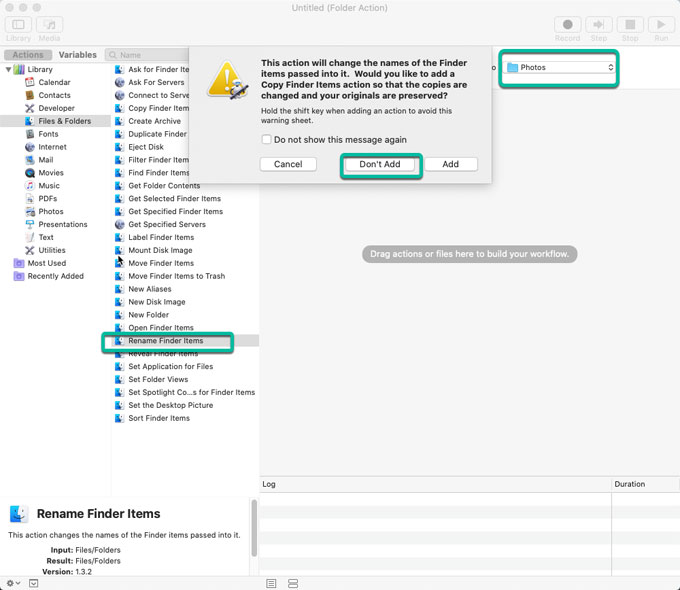
Step 5: After selecting the specified folder you want to rename photos in bulk, in our example, we will choose the Photos folder.
Step 6: Choose the option Rename Finder items under Files and Folders, drag it to the blank pane. You will receive a box prompts if you need to copy original images. If you want to keep the original file after changing the name, select add. We chose “do not add” here, because few people will keep the original file after changing the name of the image.

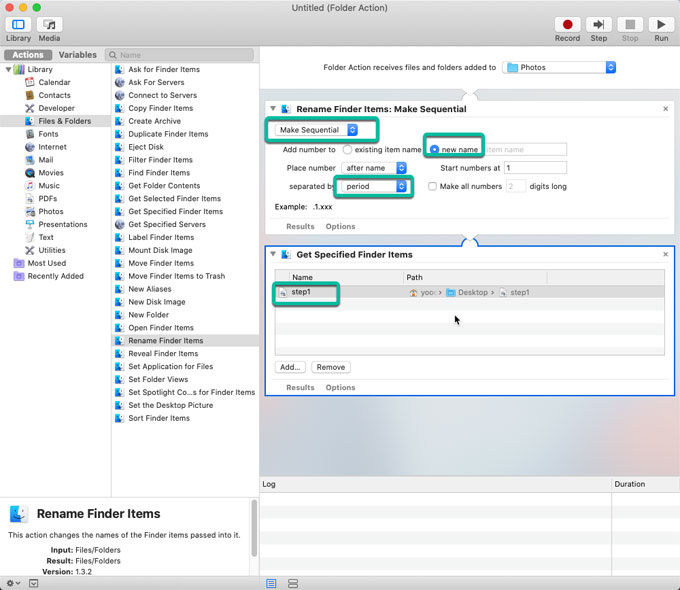
Step 7: Rename a Finder project to Make sequential number, and then select the new name below, which you can pick as you like, in this case, Photos, as the first string in the name of each photo.

Step 8: Next, drag in another “rename Finder project” to the workflow panel, and this time select “Add date or time” for the action type. The format of the time can be arbitrary, but we’ll use the default format.
In this way, a simple batch workflow to change file names is complete. Now you can drag a group of photos into the “My Photos” folder, and you can see that all the files you drag in have been changed to “Photos + date”.
Popular Posts
- What Kind of Programs do You Think are Necessary in Windows 10?
- What’s SpyHunter and How to Fix the File Being Quarantined
- How to Forcibly Remove a Program That Won’t Uninstall in Windows
- 3 Tips to Remove a Program that Won’t Uninstall
- How To Uninstall Applications On Windows 10 – Program Removal Guides
- Tutorial: How to Remove & Uninstall Programs / Applications on Windows 7