Would you be able to uninstall Joy Video To 3GP Converter 1.0 if you lost important program file? Have you ever wondered how you can be professional in removing any unwanted programs from Windows based PC? Are you trying to get things done but it takes FOREVER to delete anything? Or have you ever wanted to take care of some unknown programs but hardly know how to get started? If you answered to yes, then this place is for you! Learn step by step how to uninstall a Windows program.
Description
This guide is for people new to uninstall Joy Video To 3GP Converter 1.0 from Windows based PC. This is very much a beginner's uninstall guide! This guide will introduce you to the practical methods and show you how to uninstall and remove a program in person. You will see how to get rid of program within Windows 10, you will see how to uninstall program within Windows 7, you will also see how to uninstall program within other Windows based computers, like Windows 8, Windows 11 and more. The methods explained here are written to provide Windows users with the knowledge and skills required to troubleshoot and uninstall programs from Windows. These skills include understanding Windows built-in uninstaller, how it can be used to uninstall a program, and how to launch it on the different versions of Windows.
This guide will also include a professional method give you more confidence in removing a Windows program. You will get how to utilize a renowned uninstaller software to make the uninstall Joy Video To 3GP Converter 1.0 thing much easier than you ever could. You will get the step-by-step process of Windows program uninstallation. Those who have no basic knowledge of Windows programs' uninstallation can join the guide. This will be a very complete introduction to uninstall Joy Video To 3GP Converter 1.0 from Windows. It will also be of use to people who have used previous versions of Microsoft Windows. Along with that, you will also can pick up a series of tricks and tips regarding how to tune up and make the most of your Windows computer.
Complete Guide to Uninstall Joy Video To 3GP Converter 1.0 from Windows
Now, it is real time to make it clear what you can do to uninstall Joy Video To 3GP Converter 1.0 from any Windows PC successfully. We will introduce how to uninstall a program from the two general directions: manual uninstall guide and professional uninstaller software. You will get how to uninstall a program from Windows based PC in the manual way; you will also get how to uninstall a program from Windows based PC through a notable uninstaller software. So you can worry about nothing! I will give you the most used and powerful tool to make sure your any program uninstallation effortless and fast.
Remove Joy Video To 3GP Converter 1.0 Through Manual Way
Get how to use your own hands to uninstall Joy Video To 3GP Converter 1.0 in person. This part involves 3 solutions to uninstall a program manually. You will know how to uninstall a program separately from the Start menu, Control Panel, and the Settings page. Now, let's figure out how they work.
Remove Joy Video To 3GP Converter 1.0 from the Start Menu
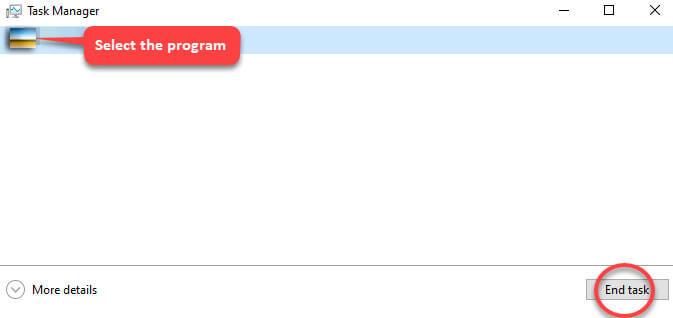
1. Open Windows Task Manager and close all process associated with the Joy Video To 3GP Converter 1.0 program.
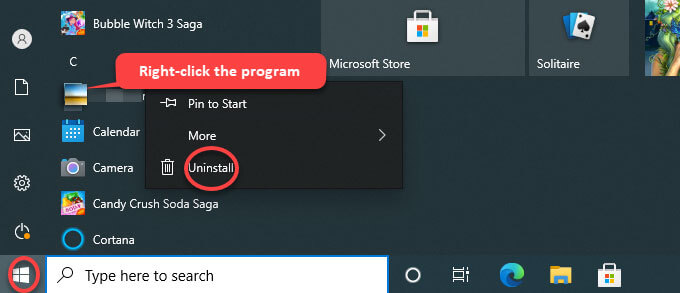
2. Click Start menu > find out the Joy Video To 3GP Converter 1.0 program in the list shown.
3. Right-click Joy Video To 3GP Converter 1.0 > select Uninstall.
4. Click Yes/Uninstall to confirm that you want to uninstall the program from your computer right now.
5. Next, follow the pop-up uninstall wizard to get the program uninstalled from your PC.
Uninstall Joy Video To 3GP Converter 1.0 from the Control Panel
1. Open Windows Task Manager and close all process associated with the Joy Video To 3GP Converter 1.0 program.
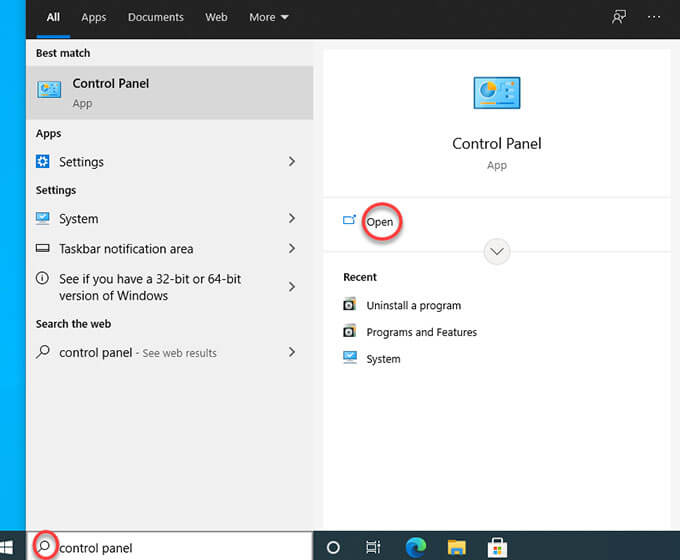
2. Click the Start menu > open Control Panel. If you are on Windows 10, you can take advantage of the Search box on the taskbar. Simply enter 'control panel' in the Search box and open it from the results.
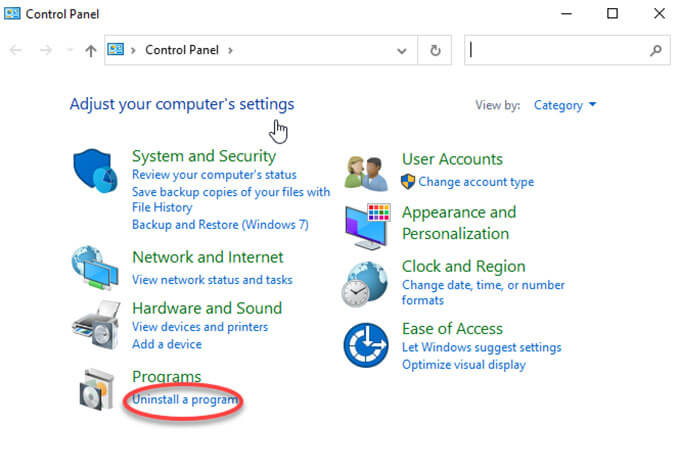
3. From the Control Panel window, click Programs > click Uninstall a program.
4. Right-click the Joy Video To 3GP Converter 1.0 program that you would like to uninstall > select Uninstall.
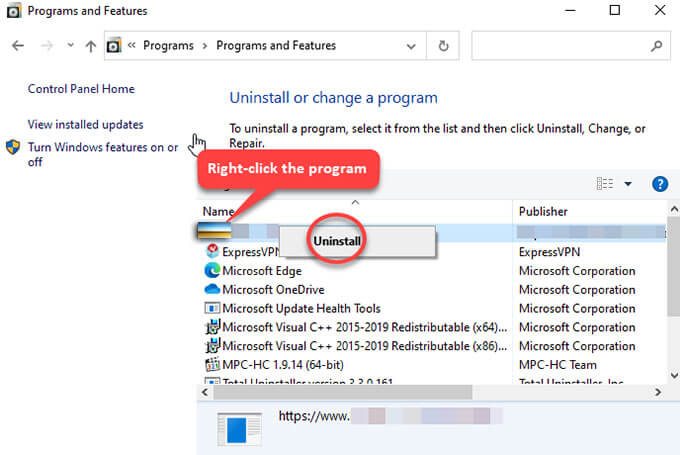
5. Click Yes/Uninstall to make sure that you are ready to uninstall the target program at once.
6 Next, follow the pop-up uninstall wizard to uninstall Joy Video To 3GP Converter 1.0 from your PC.
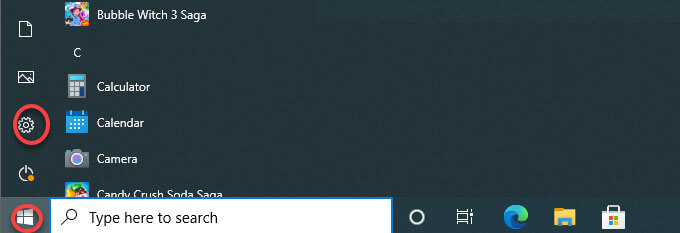
Remove Joy Video To 3GP Converter 1.0 from the Settings
1. Open Windows Task Manager and close all process associated with the Joy Video To 3GP Converter 1.0 program.
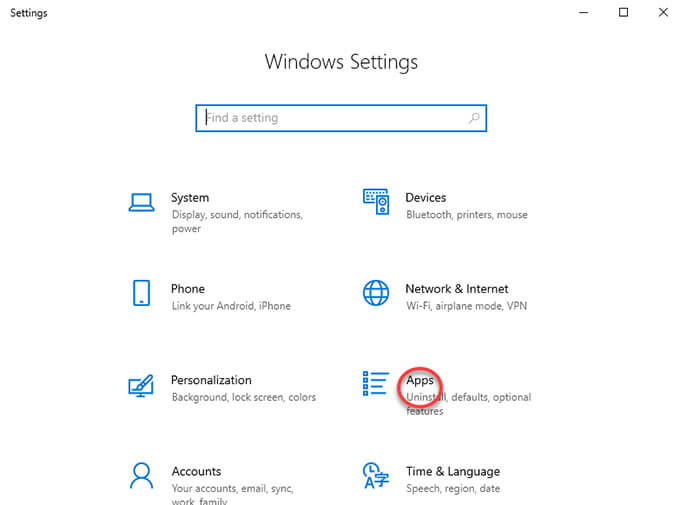
2. Click the Start menu > click Settings.
3. Click Apps > Click Apps & Features.
4. From the Apps & Features page, click the Joy Video To 3GP Converter 1.0 program > click Uninstall.
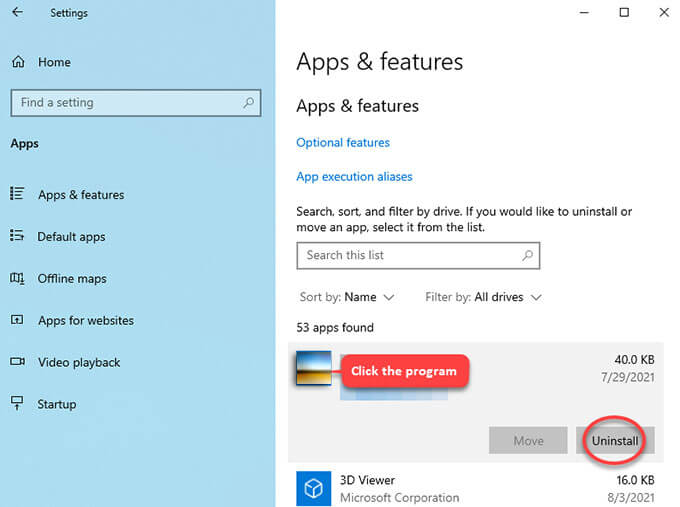
5. Click Yes/Uninstall to be sure that you want to uninstall this program.
6. Next, follow the pop-up uninstall wizard to complete the program removal.
Uninstall Joy Video To 3GP Converter 1.0 Through Total Uninstaller
Get how to utilize the renowned Total Uninstaller tool to uninstall Joy Video To 3GP Converter 1.0 and any other unwanted programs with a few clicks. Before starting to remove this program, make sure it has been quit. You can completely quit the program processes from Task Manager.
Warm tips: You can click the download button below to obtain Total Uninstaller in no time!
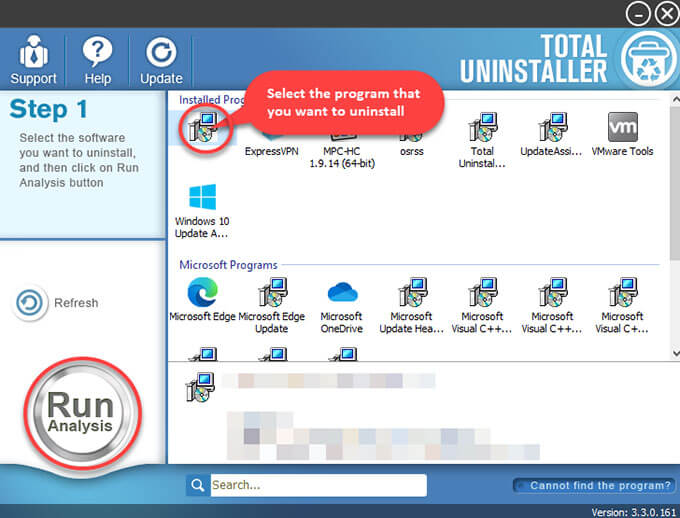
1. Launch Total Uninstaller > select Joy Video To 3GP Converter 1.0 > click Run Analysis.
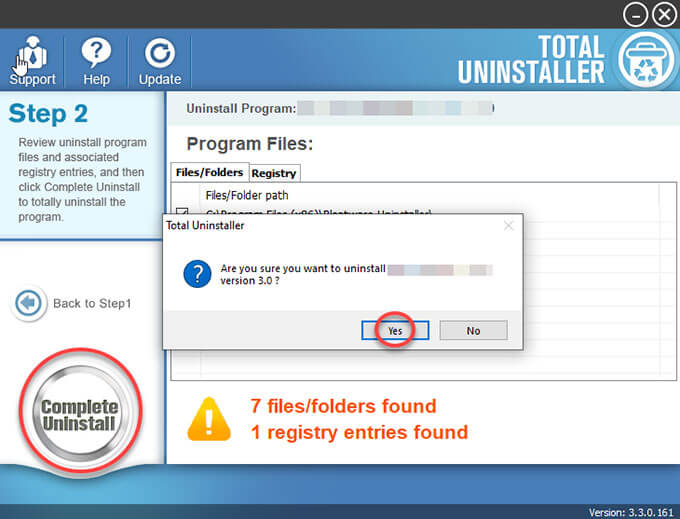
2. Click Complete Uninstall > click Yes to make sure you would like to uninstall the program.
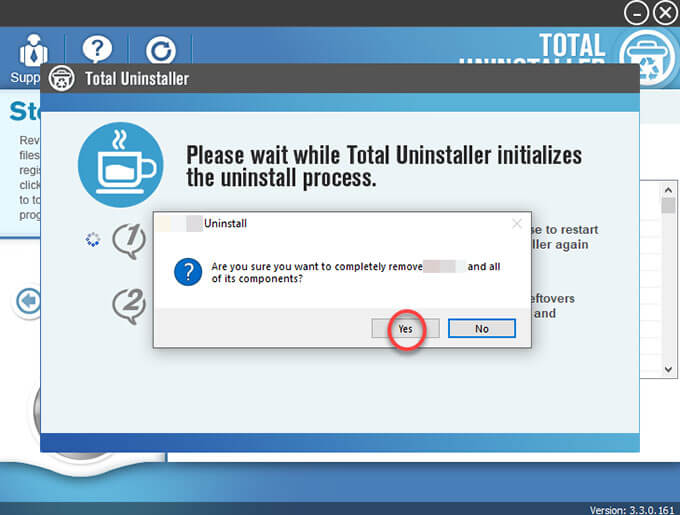
3. Click Yes to make it certain that you need to uninstall this product right now. Follow the pop-ups to get the Joy Video To 3GP Converter 1.0 program removed from your PC.
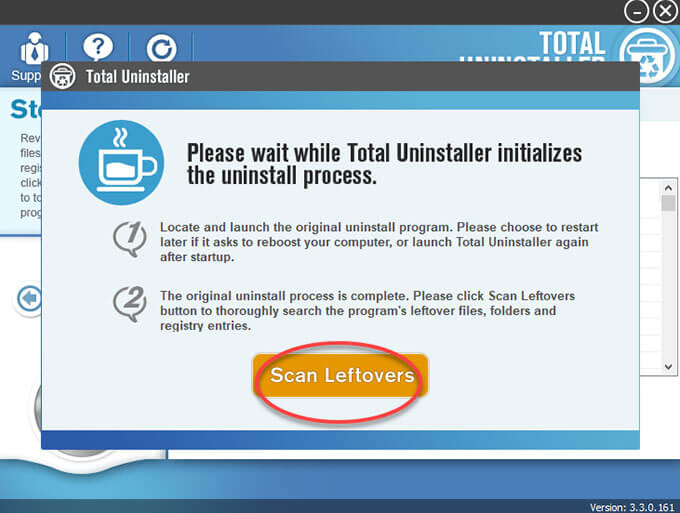
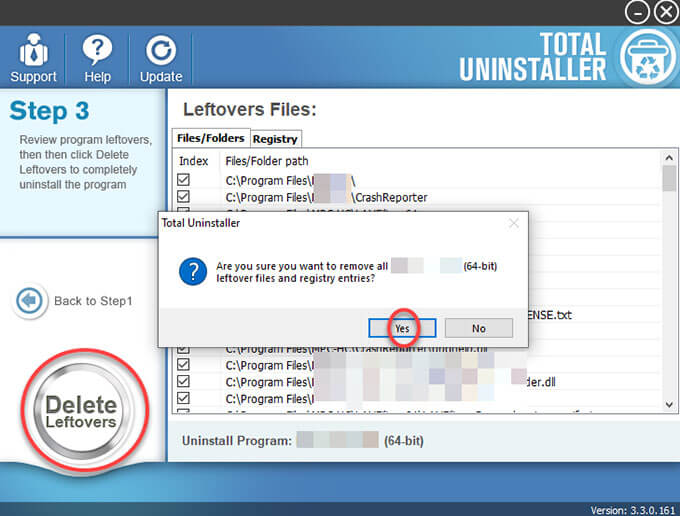
4. Click Scan Leftovers to continue deleting all leftovers associated with the program.
5. Click Delete Leftovers > click Yes to be sure you want to clean out all leftovers. Click OK when the removal is done.
6. Quit Total Uninstaller and Restart your PC.
Part 1: PC Tune Up - Clean and Tune a Windows Based PC
This part aims at telling any PC users how to be able to clean and tune a Window based PC. All tips and tricks are carefully picked in order to help any Windows user be confident in maintaining their PC themselves. So, if you are looking to cleanup and tune your computer without having to pay, don't miss out on tricks here. Check out these tricks and tips as followed.
① Removing Viruses, Malware, and Bloatware Using Windows Defender
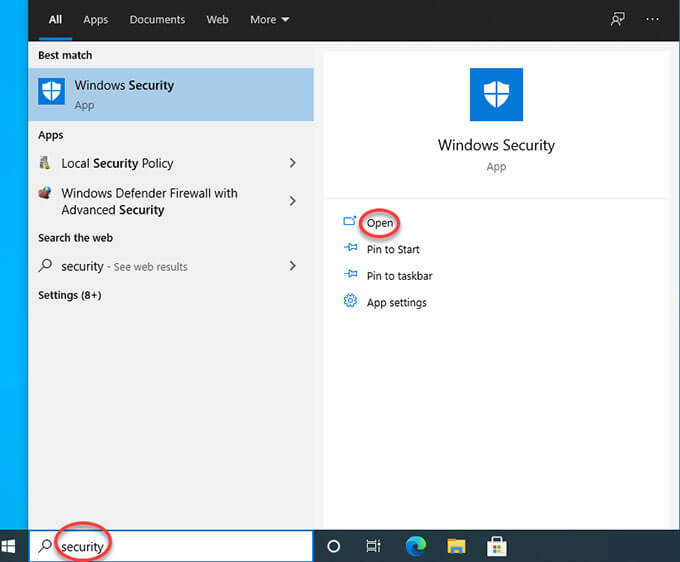
1. When you Windows PC is turned on, click the Start menu, and begin typing Security in Search box. From the search results, click open the Windows Security app.
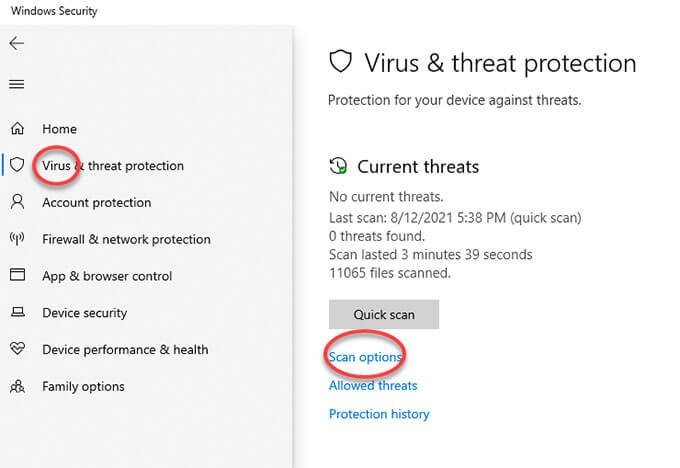
2. Select Virus & threat protection > Scan options.
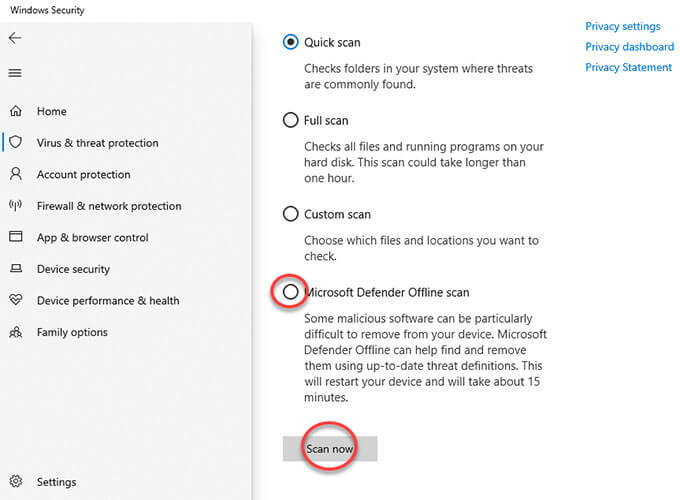
3. Select Windows Defender Offline scan, and then select Scan now.
4. Next, the Windows Defender Offline scan is running and this may take a little bit time. Once done, your PC will restart.
② Cleaning the System Files and Registry Using Disk Cleanup
To clean the useless system files and registry, we will take advantage of the Disk Cleanup tool that is built-in in Windows. Disk Cleanup is an easy-to-use computer maintenance utility, responsible for free up disk space on a Windows computer. So, if you want to clean up your computer's hard drive, the built-in Disk Cleanup app is a good choice.
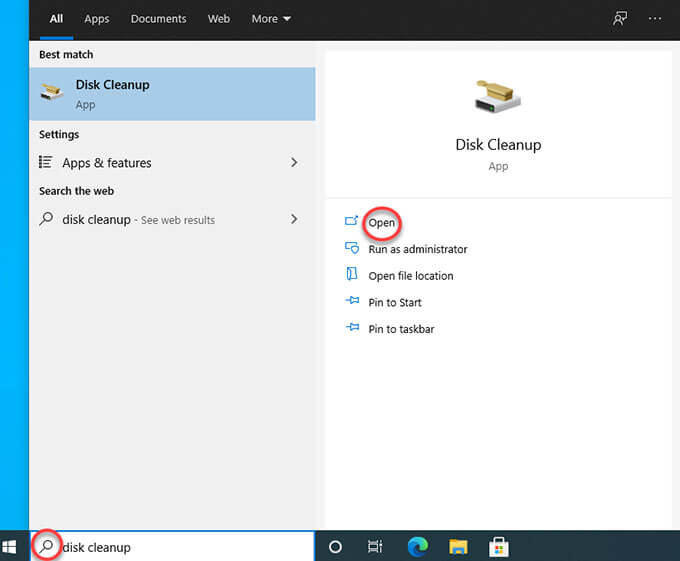
1. Locate at the Search box on the taskbar > fill in "disk cleanup" > click Open to launch Disk Cleanup utility from the list of results.
2. Select the drive you want to clean up, and then select OK.
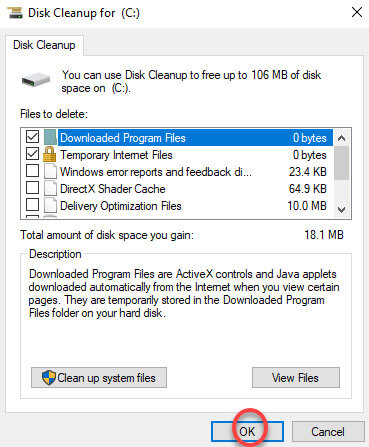
3. Under Files to delete, select the file types to delete. To get a description of the file type, select it. Click OK.
4. If you want to free up more space, you just need to delete system files. So, click Clean up system files in Disk Cleanup.
5. Select the file types to remove. To get a description of the file type, select it.
6. Select OK.
Please note: In Windows 7, open the Start Menu and type the word "disk" in Search box. Then, click on the Disk Cleanup in search result.
③ Deleting Unused / Background Files
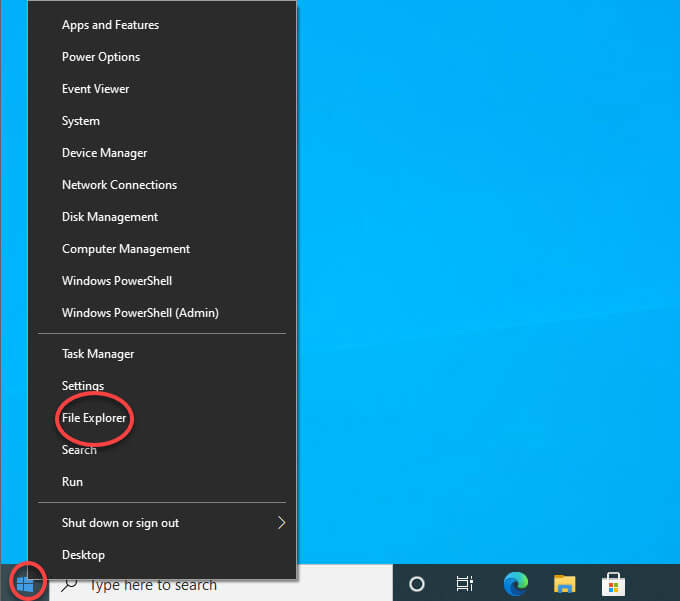
1. Right-click Start menu > click File Explorer option from the list.
2. File Explore window is opened, navigate to the path: C:\Windows\Web and then open Wallpaper folder.
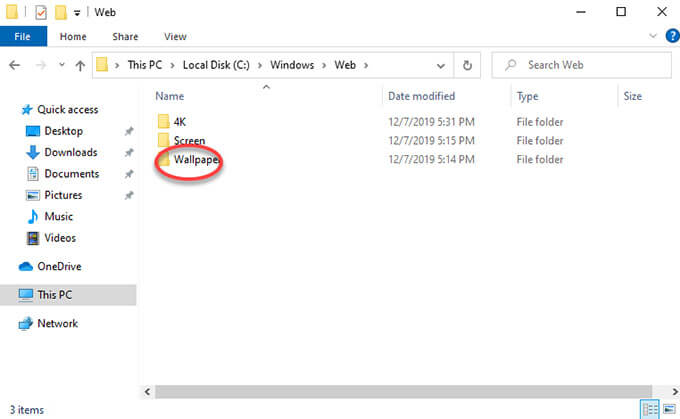
3. In the Wallpaper folder, you can choose to delete those unwanted Desktop Background images.
4. To delete a specific background image, right click the image and click Delete.
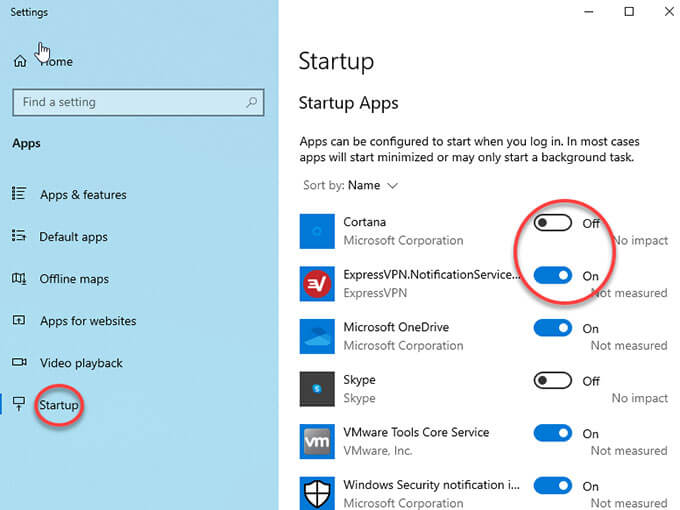
④ Optimizing Windows Startup
To increase your Windows startup speed, you can disable some programs and stop them from starting up when your computer is booting up.
1. If you are on Windows 10: Click Start menu > click Settings > click Apps from the Settings page.
2. Locate at the Startup option at the left-hand side of the page. On the right-hand side, you can click Off to disable any app that you don't want to startup.
3. If you are on Windows 7: Click the Start menu > type msconfig in Serch box and press Enter key.
4. In the System Configuration window > click the Startup tab. Uncheck apps to disable them. Click OK to apply the change.
⑤ Keep Your PC up to Date
Like cars, your computer also needs some updates to make sure it is run better. Keeping your PC up to date also is an easy way to maintain it, will automatically solve some bugs and network issues and more. You can refer to the steps below to keep your PC up to date.
1. The first thing is to make sure your Internet is connected. And then open Internet Explorer. Click Start menu, and enter Internet Explorer in Search box. Open Internet Explorer (Desktop app) from the results.
2. On the Tools menu, select Windows Update.
3. If Microsoft Update is not installed, select Microsoft Update.
4. From the Welcome to Microsoft update page, select Check for Updates.
5. From the Keep your computer up-to-date window, select Express to install high priority updates.
6. On the Review and Install Updates page, select Install Updates, and then follow the instructions on the screen to complete the installation.
Pat 2: Hard Drive Maintenance
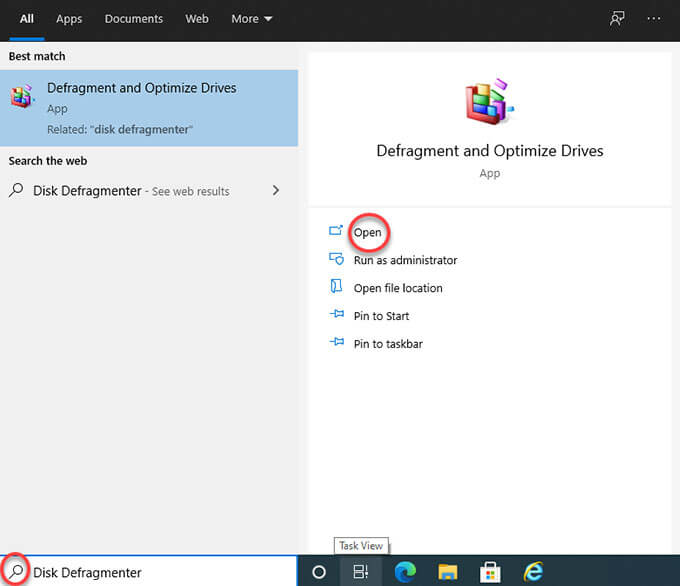
Maintaining your Windows hard drive will help your PC boot up faster. And the method is very easy, you can take advantage of the Disk Defragmenter tool.
1. Click Start button > enter Disk Defragmenter in the search box > open Disk Defragmenter in the list of result.
2. Under Current status, select the disk you want to defragment. To make sure whether the disk you selected needs to be defragmented or not, you only need to click Analyze disk. If it is necessary, enter your admin password to start this operation.
3. When you get the result, if the percentage is above 10%, it is highly recommended you defragment the disk. Click Defragment disk and enter a password to confirm that you want to perform this defragment.
Along with that, cleaning your computer physical hardware also can make it run faster. Refer to some issues you may encounter due to dust build up upon your hardware.
Issues:
- 1) Cause overheating
- 2) Not run efficiently
- 3) Overall effecting the performance
Solutions:
The first thing you need to clean your hardware is a small to medium paint brush. And then you are going to need compressed a dust can or a compressor. You can choose to use one of them, preferably probably a compressor is actually better to use and it will be more consistent and it is easier to use to set the pressure a bit lower not too hard. Because you don't really want to lock damage any of the parts in the computer.
Pat 3: Memory Diagnostic
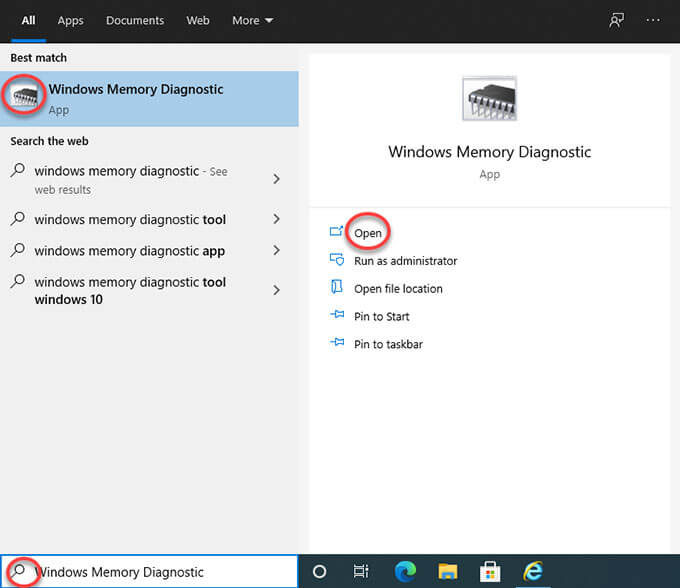
Another thing you may also do is to check your memory. So if you have any memory issues and for that we are going to go to Windows memory diagnostics. Now go to Windows memory diagnostics according to the following steps.
1. Click the Start menu, type "Windows Memory Diagnostic", and press Enter. Right-click on Windows Memory Diagnostic in the search result and click Run as Administrator.
(Or you can press Windows Key + R, type the word "mdsched.exe" into the Run box that appears, and then press Enter key.)
2. Click Restart now and check for problems. Before doing this, save your work and close any open programs.
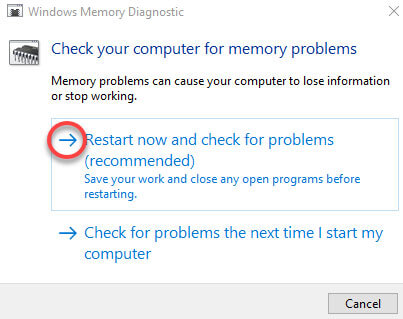
3. Your computer will restart in the Memory Diagnostic Tool and run a basic memory test.
4. Press F1 to stop the basic test and go into the Options screen.
5. Use the down arrow to select Extended. Press F10
6. Once the Memory Diagnostic Tool completes, make note of any errors reported
7. Hit Esc to exit the tool and boot into Windows
Conclusion
Till now, you may understand how you can tune up your PC and make it run faster. Whether you want to get rid of junk files that left on your PC after a program uninstall, clean up junk registry, maintain hard driver, uninstall and get rid of malware, or more other tips to optimize your PC, you can discover an answer here. As to today's main topic how to uninstall Joy Video To 3GP Converter 1.0, you will also get a complete guide to help you succeed in removing any unwanted programs from Window based PC. The goal of this post is to save people time and efforts by allowing them to learn how to uninstall Joy Video To 3GP Converter 1.0 or any other unwanted programs, and tune their computer. And for those users who want to be effortless in removing any program and give this professional Total Uninstaller a try, simply click the download button below to get started with ease.